Mycelium for professionals
Then I’ve got news for you! Starting your outdoor mushroom patch is as simple as taking candy from a baby. You just need to follow a few easy steps.
Choosing the right species for your little (or big) outdoor project depends on a couple of things. First, your climate zone. Don’t expect to reap the fruits of your labour, if you try to grow an exotic mushroom like Volvariella volvacea in Lapland. Have a look on a plant hardiness map. If you’re located in zone 7, 8 or 9, you’re in luck since most mushrooms can be grown there.
Second, the amount of tender loving care you’re willing to bestow on the fungus. If you want to set and forget, hardwood logs are just the thing for you. If you’re like me and enjoy having a pet fungus, you might want a hands-on project. An outdoor patch requires a little more TLC but will fruit faster and produce more mushrooms.
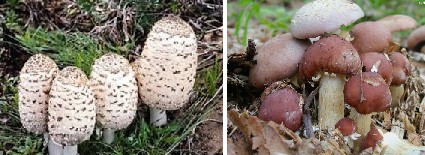
Since growing mushrooms on hardwood logs is a whole different ball game, we’ll focus on regular outdoor litter patches. For these, the easiest species to get started would be Coprinus comatus (left) and Stropharia rugoso-annulata (right).
To find the perfect spot in your garden, you should look for a shaded area. Lots of direct sunlight will evaporate your substrate’s water content in a heartbeat, halting growth. Don’t worry if it catches some sunshine during the day, they’re not vampires. Preferably around trees and without soil pollution.
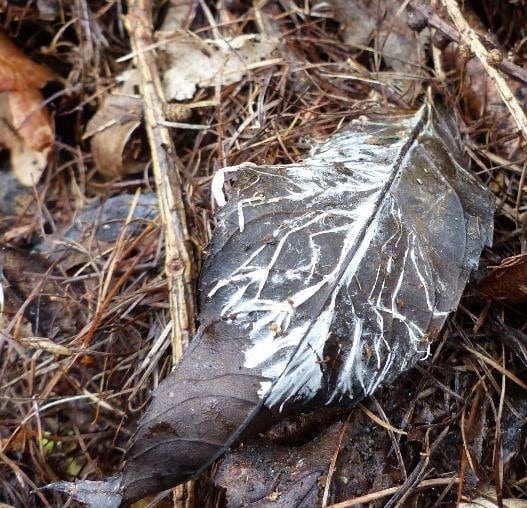
Remember that studies have shown fungi can relocate heavy metals from soil to fruiting bodies.
You can start your patch anytime, but early autumn and spring are best. Temperatures are ideal and there’s enough precipitation to keep the substrate wet. The fungus will have no problem establishing a healthy colony to survive winter or summer.
Depending on your climate zone, you can also start your patch in winter or summer. Keep in mind though that extreme temperatures are not beneficial to the organism, especially if you just inoculated the substrate. A well-established colony is much more efficient in surviving these seasons than a freshly inoculated one. If you really don’t want to wait for the perfect time, add an extra layer of leaf litter. This will act as an insulant and will keep temperature swings and evaporation at bay.
What you’ll need:
Grain spawn can also be used to inoculate your patch. Be aware that prowling critters will take an interest in the free food lying around.
Regularly watering your patch keeps it hydrated and will result in a healthy colony. Use common sense as with plants. If you’re in a drought, give it some water like the good Samaritan you are. If you’re like us however, living in Belgium, Pachamama will take care of it for you. Like any other pet, you’ll have to feed it. Every year add some new straw and/or sawdust and watch it build your soil.
Besides straw, you can also use sawdust, woodchips, manure or a combination of all. If you’re having trouble sourcing sawdust, try hydrating some hardwood fuel pellets. Don’t use grass clippings because you’ll end up with a slimy, stinky mess.
Found the perfect spot in between trees and don’t want to disturb their roots? You don’t necessarily have to dig. Just place a cardboard base layer on the ground and build your patch from there. Raised beds are also a possibility. Be careful around trees with parasitic fungi though. You’re better off raising compost mushrooms in their vicinity.
If you want to raise multiple species in your garden, you can divide your patch in two parts. Don’t mix the spawn. Odds are, one species will outcompete the other, leaving you with just one type of mushroom.
Other than Stropharia rugoso-annulata and Coprinus comatus you can also try your hand at Pleurotus ostreatus, Pleurotus eryngii, Pleurotus citrinopileatus and Lepista nuda.
 Stand back and watch as your patch becomes the centre of activity in your garden. The mycelium will attract insects, slugs, birds, etc. An ecosystem on its own.
It’s also a great teaching moment for kids who want to learn about the life cycle of perfect fungi. You’ll see the process of the fungus through the substrate, watch as it produces mushrooms and how it degrades its food to top notch soil.
Creating your own outdoor patch is easy as pie. You just need to be quicker than the slugs if you want to enjoy the fruits of your labour.